How we created Review Page Custom widgets with Flutter
- Mobile
- July 20, 2018
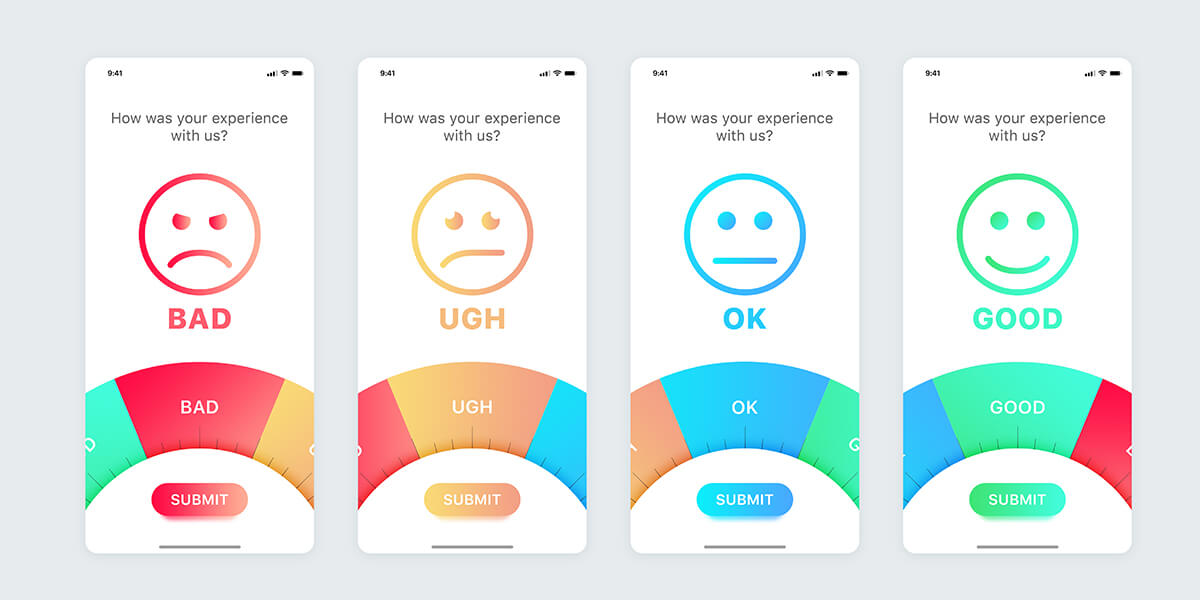
At Mindinventory we have some incredibly creative minds, that live in wild and come up with wilder ideas, One of them is Ketan, One day he came to me with this Review page interaction, I saw the tweens between the different review expressions animations, It was one of the awesome looking interactions I ever saw, Promptly we decided to make it real.
Decided to do it with Flutter
When this happened, I was just getting my hands dirty with Flutter, I saw in Flutter they have literally recreated all the default ui controls of Android and iOS using Dart(The language Flutter uses), This widgets are made with utmost precision and details, still the performance was par with the default ui kits, Although there are bunch of tailor made widgets available from first party but customisation was what we need to achieve as our goal, Dart was a new language for us at Mindinventory.
It was largely unknown to many until they introduced Flutter, With Flutter the good thing is 60 FPS smooth animations are easily achievable and that is what we need, I jumped on it and decided to check the ability of Flutter by creating this Review Page widgets with Flutter. Meanwhile you can also check the animation on Dribbble and Behance.
A Widget is what we need
One thing about Flutter that you will have love-hate relationship is Everything is a Widget, From your App to that shiney little checkbox and from Handling orientation to reacting to click events, A type of widget is what you need, What I have done is create two custom widgets in Flutter for this project, one is the Smiley with Expressions and another is the Arc menu,
Let’s talk in depth about what it takes to create this masterpiece.
Rendering expressions on canvas

Creating custom painter
It was straightforward to define a class that extends CustomPainter which directly gives us access to Canvas to draw anything in it at will.
class SmilePainter extends CustomPainter {
  @override
  void paint(Canvas canvas, Size size) {
        …rendering logic
  }
    @override
  bool shouldRepaint(CustomPainter oldDelegate) {
    …logic to determine if we need to repaint or not
    return true;
  }
}
And below is how it can be added to layout.
CustomPaint(
  size: Size(MediaQuery.of(context).size.width, (MediaQuery.of(context).size.width / 2) + 80),
  painter: SmilePainter(slideValue),
)
Holding State of Expressions
We have to draw smiley with 4 different expressions Okay, Good, Bad and Ugh, Here expressions are made to represent what user feel when he choose particular rating, What we got to do is Animate the Eyes and Mouth according to the selected expression.

First thing came to my mind was SVG files and VectorDrawables I am used to in Android, sadly Flutter doesn’t support this kind of SVG Animation just yet, flutter_svg package gave some hope but It was of no use as it is not possible to animate this expressions with it, I had to dig deeper and then I found this CustomPainter class, It gives us kind of total control over what is shown on screen(as widget), and I was like hale luya that is what we need :),
First I started with drawing the expressions of four states, as part of it I defined ReviewState class as follows:
class ReviewState {
  //smile end points
  Offset leftOffset;
  Offset centerOffset;
  Offset rightOffset;

  //smile handle points
  Offset leftHandle;
  Offset rightHandle;

  String title;
  Color titleColor;

  //gradient colors
  Color startColor;
  Color endColor;
}
It holds state of rendering the expression, In this class I covered
- Gradient start color and end color
- Three points of the mouth and two anchor points which define the curvature of the mouth
- the title text and it’s color.
Defining was the easy part, We defined the four states, one for each expression, Now let’s check how we animate between those states.
Tweening between states
To tween between each of this state I had defined a range which covers all the states, I defined 0 to 400 as a range, within which I defined location of each state,
i. e. 0 would be BAD, 100 would be UGH, 200 would be OK, 300 would be GOOD and finally 400 would be BAD again.
Essentially creating a loop as we need with the arc menu, which we will see later in this post.
You can check this logic by uncommenting Slider in main.dart
Here is how we tween between each of the shapes:
//create new state between given two states.
static ReviewState lerp(ReviewState start, ReviewState end, double ratio) {
  var startColor = Color.lerp(start.startColor, end.startColor, ratio);
  var endColor = Color.lerp(start.endColor, end.endColor, ratio);

  return ReviewState(
    Offset.lerp(start.leftOffset,end.leftOffset, ratio),
    Offset.lerp(start.leftHandle, end.leftHandle, ratio),
    Offset.lerp(start.centerOffset, end.centerOffset, ratio),
    Offset.lerp(start.rightHandle, end.rightHandle, ratio),
    Offset.lerp(start.rightOffset, end.rightOffset, ratio),
    startColor,
    endColor,
    start.titleColor,
    start.title);
}
Here we have created our own lerp(linear interpolation) method for our ReviewState while utilising Offset.lerp and Color.lerp, this methods will tween between the two ReviewState instances, It will create intermediate values for the gradient colors and mouth curve according to the ratio we provide, quite handy isn’t it? Here is how it looks after linking the slide onChanged event with our rendering:
Tweening the Text
Alongside the Expressions we are also tweening the text, it will translate text position as well as opacity, for that we initially determine three positions, center, left and right text position and relative to that position we animate the Text animation as you can see here:
tweenText(ReviewState centerReview, ReviewState rightReview, double diff,
Canvas canvas) {

  currentState = ReviewState.lerp(centerReview, rightReview, diff);

  TextSpan spanCenter = new TextSpan(
    style: new TextStyle(
      fontWeight: FontWeight.bold,
      fontSize: 52.0,
      color: centerReview.titleColor.withAlpha(255 - (255 * diff).round())
    ),
    text: centerReview.title
  );
  TextPainter tpCenter =
new TextPainter(text: spanCenter, textDirection: TextDirection.ltr);

TextSpan spanRight = new TextSpan(
  style: new TextStyle(
    fontWeight: FontWeight.bold,
    fontSize: 52.0,
    color: rightReview.titleColor.withAlpha((255 * diff).round())),
    text: rightReview.title);
    TextPainter tpRight = new TextPainter(text: spanRight, textDirection: TextDirection.ltr);
    tpCenter.layout();
    tpRight.layout();
    Offset centerOffset = new Offset(centerCenter - (tpCenter.width / 2), smileHeight);
    Offset centerToLeftOffset = new Offset(leftCenter - (tpCenter.width / 2), smileHeight);
    Offset rightOffset = new Offset(rightCenter - (tpRight.width / 2), smileHeight);
    Offset rightToCenterOffset = new Offset(centerCenter - (tpRight.width / 2), smileHeight);
    tpCenter.paint(canvas, Offset.lerp(centerOffset, centerToLeftOffset, diff));
    tpRight.paint(canvas, Offset.lerp(rightOffset, rightToCenterOffset, diff));
}
We are calculate the distance between the three text positions considering the longest text among all, which is ‘GOOD’, We are then doing the lerp procedure between those positions and at the same time we are changing opacity(alpha) in a way that the text animating to the center will increase it’s opacity while the one leaving center position will fade out.
Animating expression of Eyes
The most exciting part of this expressions was animation with the eyes, especially in BAD and UGH states, Initially I thought of doing path transformation but that will include complex path creation process, later I decided to go with easy and practical way, which was drawing that cutouts over the eyes it self, essentially creating the desired effect:
For Eyes animation of BAD expression, what we did is draw a triangle above the eyes, whose one point will shrink and expand according to current state, Let’s have a look at the code for same:
//draw the edges of BAD Review
if (slideValue <= 100 || slideValue > 300) {
  double diff = -1.0;
  double tween = -1.0;
  if (slideValue <= 100) {
    diff = slideValue / 100;
    tween = lerpDouble(eyeY-(eyeRadiusbythree*0.6), eyeY-eyeRadius, diff);
  } else if (slideValue > 300) {
    diff = (slideValue - 300) / 100;
    tween = lerpDouble(eyeY-eyeRadius, eyeY-(eyeRadiusbythree*0.6), diff);
  }
  List<Offset> polygonPath = List<Offset>();
  polygonPath.add(Offset(leftEyeX-eyeRadiusbytwo, eyeY-eyeRadius));
  polygonPath.add(Offset(leftEyeX+eyeRadius, tween));
  polygonPath.add(Offset(leftEyeX+eyeRadius, eyeY-eyeRadius));
  Path clipPath = new Path();
  clipPath.addPolygon(polygonPath, true);
  canvas.drawPath(clipPath, whitePaint);
  List<Offset> polygonPath2 = List<Offset>();
  polygonPath2.add(Offset(rightEyeX+eyeRadiusbytwo, eyeY-eyeRadius));
  polygonPath2.add(Offset(rightEyeX-eyeRadius, tween));
  polygonPath2.add(Offset(rightEyeX-eyeRadius, eyeY-eyeRadius));
  Path clipPath2 = new Path();
  clipPath2.addPolygon(polygonPath2, true);
  canvas.drawPath(clipPath2, whitePaint);
}
For drawing the eyeballs for UGH state we are drawing circles above the eyes, To achieve the eyeball expand and shrink effect we are changing one end of the Rect we use to draw eyeball circles, Here is how we do it:
//draw the balls of UGH Review
if (slideValue > 0 && slideValue < 200) {
  double diff = -1.0;
  double leftTweenX = -1.0;
  double leftTweenY = -1.0;
  double rightTweenX = -1.0;
  double rightTweenY = -1.0;
  if (slideValue <= 100) {
    // bad to ugh
    diff = slideValue / 100;
    leftTweenX = lerpDouble(leftEyeX-eyeRadius, leftEyeX, diff);
    leftTweenY = lerpDouble(eyeY-eyeRadius, eyeY, diff);
    rightTweenX = lerpDouble(rightEyeX+eyeRadius, rightEyeX, diff);
    rightTweenY = lerpDouble(eyeY, eyeY-(eyeRadius+eyeRadiusbythree), diff);
  } else {
    // ugh to ok
    diff = (slideValue - 100) / 100;
    leftTweenX = lerpDouble(leftEyeX, leftEyeX-eyeRadius, diff);
    leftTweenY = lerpDouble(eyeY, eyeY-eyeRadius, diff);
    rightTweenX = lerpDouble(rightEyeX, rightEyeX+eyeRadius, diff);
    rightTweenY = lerpDouble(eyeY-(eyeRadius+eyeRadiusbythree), eyeY, diff);
  }
  canvas.drawOval(Rect.fromLTRB(leftEyeX-(eyeRadius+eyeRadiusbythree),
  eyeY-(eyeRadius+eyeRadiusbythree), leftTweenX, leftTweenY), whitePaint);
  canvas.drawOval(Rect.fromLTRB(rightTweenX, eyeY, rightEyeX+(eyeRadius+eyeRadiusbythree),eyeY-(eyeRadius+eyeRadiusbythree)), whitePaint);
}
Creating Interactive Arc menu widget
Earlier in this post what we saw was how we are drawing the expressions, it was non interactive and it needs to be triggered by other control, either by the Slider widget or this arc widget we will see,
For this control I decided to add up what I learned till now, In this widget we need to create a CustomPainter too but this time decided to wrap it inside a widget called ArcChooser for better abstraction and structure, This needs to be StatefulWidget as we need to change states when interaction is done by user so we have state class called ChooserState and a Painter called ChooserPainter, With this implementation we are defining all the logic calc inside the state class while keeping the rendering related stuff in Painter as expected.
Defining and Rendering Arc items
In our case we need to create an infinite arc that keeps going on, regardless of which direction user scrolls, it will keep scrolling in circular motion, To achieve that we are defining 8 arc items which will take 45° each as obvious act I have created following class to programatically represent an Arc menu Item:
class ArcItem {
  String text;
  List<Color> colors;
  double startAngle;
  ArcItem(this.text, this.colors, this.startAngle);
}
We are passing this items to our ChooserPainter to further get it drawn on screen, Let’s see what we do in it:
var dummyRect = Rect.fromLTRB(0.0, 0.0, size.width, size.height);
for (int i = 0; i < arcItems.length; i++) {
  canvas.drawArc(
    arcRect,
    arcItems[i].startAngle,
    angleInRadians,
    true,
    new Paint()
    ..style = PaintingStyle.fill
    ..shader = new LinearGradient(
    colors: arcItems[i].colors,
  ).createShader(dummyRect));
  //Draw text
  TextSpan span = new TextSpan(style: new TextStyle(fontWeight: FontWeight.normal, fontSize: 32.0, color: Colors.white), text: arcItems[i].text);
  TextPainter tp = new TextPainter(text: span, textAlign: TextAlign.center, textDirection: TextDirection.ltr,);
  tp.layout();
  //find additional angle to make text in center
  double f = tp.width/2;
  double t = sqrt((radiusText*radiusText) + (f*f));
  double additionalAngle = acos(((t*t) + (radiusText*radiusText)-(f*f))/(2*t*radiusText));
  double tX = center.dx + radiusText*cos(arcItems[i].startAngle+angleInRadiansByTwo - additionalAngle);// - (tp.width/2);
  double tY = center.dy + radiusText*sin(arcItems[i].startAngle+angleInRadiansByTwo - additionalAngle);// - (tp.height/2);
  canvas.save();
  canvas.translate(tX,tY);
  // canvas.rotate(arcItems[i].startAngle + angleInRadiansByTwo);
  canvas.rotate(arcItems[i].startAngle+angleInRadians+angleInRadians+angleInRadiansByTwo);
  tp.paint(canvas, new Offset(0.0,0.0));
  canvas.restore();
  //big lines
  canvas.drawLine( new Offset(center.dx + radius4*cos(arcItems[i].startAngle), center.dy + radius4*sin(arcItems[i].startAngle)), center, linePaint);
  canvas.drawLine( new Offset(center.dx + radius4*cos(arcItems[i].startAngle+angleInRadiansByTwo), center.dy + radius4*sin(arcItems[i].startAngle+angleInRadiansByTwo)), center, linePaint);
  //small lines
  canvas.drawLine( new Offset(center.dx + radius5*cos(arcItems[i].startAngle+angleInRadians1), center.dy + radius5*sin(arcItems[i].startAngle+angleInRadians1)), center, linePaint);
  canvas.drawLine(
new Offset(center.dx + radius5*cos(arcItems[i].startAngle+angleInRadians2), center.dy + radius5*sin(arcItems[i].startAngle+angleInRadians2)), center, linePaint);
  canvas.drawLine( new Offset(center.dx + radius5*cos(arcItems[i].startAngle+angleInRadians3), center.dy + radius5*sin(arcItems[i].startAngle+angleInRadians3)), center, linePaint);
  canvas.drawLine( new Offset(center.dx + radius5*cos(arcItems[i].startAngle+angleInRadians4), center.dy + radius5*sin(arcItems[i].startAngle+angleInRadians4)), center, linePaint);
}
As you can see in this code, drawing arcs was straight forward, just that for painting gradient inside the arc items required us to create a gradient paint object for each item.
Apart from that we are drawing lot of other stuff, We need to render the arc item label in particular angle as user does interaction with our Arc menu, Drawing text in particular angle requires following steps:
- find the exact x,y position which draws text in center of arc, keeping in mind the width of text
- draw it in right angle, which requires us to rotate the canvas in given angle, draw our text and restore the canvas,
We are also calculating different radius to draw the text, the lines, shadow and the white arc,
One thing I found new with Flutter was that It allows us to draw Shadow :), I didn’t find such thing anywhere else, See here is our outcome:

Handling user interaction
When user does interaction with arc menu, we need to rotate the arc accordingly, we need to handle two scenarios in this,
- when user is actively dragging the arc
- when user flings the arc.
Here is how we handle it with GestureDetector widget:
GestureDetector(
  onPanStart: (DragStartDetails details) {
    startingPoint = details.globalPosition;
    var deltaX = centerPoint.dx - details.globalPosition.dx;
    var deltaY = centerPoint.dy - details.globalPosition.dy;
    startAngle = atan2(deltaY, deltaX);
  },
  onPanUpdate: (DragUpdateDetails details) {
    endingPoint = details.globalPosition;
    var deltaX = centerPoint.dx - details.globalPosition.dx;
    var deltaY = centerPoint.dy - details.globalPosition.dy;
    var freshAngle = atan2(deltaY, deltaX);
    userAngle += freshAngle - startAngle;
    setState(() {
      for (int i = 0; i < arcItems.length; i++) {
        arcItems[i].startAngle = angleInRadiansByTwo + userAngle + (i * angleInRadians);
      }
    });
    startAngle = freshAngle;
  },
  onPanEnd: (DragEndDetails details){
    //find top arc item with Magic!!
    bool rightToLeft = startingPoint.dx<endingPoint.dx;
    //Animate it from this values
    animationStart = userAngle;
    if(rightToLeft) {
      animationEnd +=angleInRadians;
      currentPosition--;
      if(currentPosition<0){
        currentPosition = arcItems.length-1;
      }
    }else{
      animationEnd -=angleInRadians;
      currentPosition++;
      if(currentPosition>=arcItems.length){
        currentPosition = 0;
      }
    }
    if(arcSelectedCallback!=null){
      arcSelectedCallback(currentPosition, arcItems[(currentPosition>=(arcItems.length-1))?0:currentPosition+1]);
    }
    animation.forward(from: 0.0);
  },
  child: CustomPaint(
    size: Size(MediaQuery.of(context).size.width,
    MediaQuery.of(context).size.width / 2),
    painter: ChooserPainter(arcItems, angleInRadians),
  ),
)
Here when user finish his touch gesture, we need to bring our arc menu to most eligible arc item as per the direction of fling, For that we are using AnimationController, Wonderful thing about AnimationController is that you can define a range of Animation value and run a subset of it at any given time,
Check how we are animating the change in expressions when we detect change in current item, it is triggered via our Callback implementation ArcSelectedCallback, here is how we have consume the callback:
ArcChooser()
..arcSelectedCallback = (int pos, ArcItem item) {
  int animPosition = pos - 2;
  if (animPosition > 3) {
    animPosition = animPosition - 4;
  }
  if (animPosition < 0) {
    animPosition = 4 + animPosition;
  }
  if (lastAnimPosition == 3 && animPosition == 0) {
    animation.animateTo(4 * 100.0);
  } else if (lastAnimPosition == 0 && animPosition == 3) {
    animation.forward(from: 4 * 100.0);
    animation.animateTo(animPosition * 100.0);
  } else if (lastAnimPosition == 0 && animPosition == 1) {
    animation.forward(from: 0.0);
    animation.animateTo(animPosition * 100.0);
  } else {
    animation.animateTo(animPosition * 100.0);
  }
  lastAnimPosition = animPosition;
}
We are on our last stand, As you might know this will work flawlessly on Android and iOS, check it out:

Check full source code of Review Page Interaction on Github


